
http://www.adafruit.com/products/998
I decided to go mainstream and get the PI but there is some other interesting stuff out there.
Found some articles on competing products,
http://www.tomshardware.com/news/ODROID-X-Raspberry-Pi-Quad-Core-Buy-Online,16293.html
This one has a GPIO breakout connector
The android OS appeals to me, since I already know how to write Android apps.
http://www.hardkernel.com/renewal_2011/products/prdt_info.php
This one has an add on breakout board for IO, but says the example code "will be released". The company website is half in Korean. I'm sure it is great but it could end up being a major headache and hours of non fun debugging software and getting unsupported stuff to work. No thanks.
This one looks more promising. It has a GPIO header. $79
http://www.tomshardware.com/news/VIA-APC-8750-WonderMedia-ARM-Neo-ITX,15721.html
Android 4.0
The previous version was trashed on newegg for being slow, unstable and useless for video
http://www.newegg.com/Product/Product.aspx?Item=N82E16813177001
Web page is minimalist at best. That is kind of cool, but...
The forum is dead. Can only buy the new rock board from them.
I also picked up a breakout connector for the IO pins

http://www.adafruit.com/products/914
and a plastic case

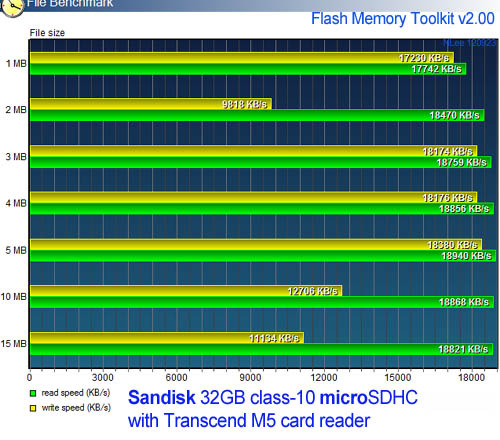
It also needs a >4Gb micro SD card. I chose a class 10 16G to try to keep the disk write time to a minimum.
It takes some digging to figure out what SD cards are faster. Retailers don't always show the speed.
I stuck with SanDisk, having worked with them in my real job they are a reputable company and they try to meet the specs they claim.
Sandisk 4GB MicroSDHC Memory Card with SD Adapter (BULK Packaging)

This initially identical $6 card has a part number in the description. SDSDQ004GA11M
SanDisk 4GB microSDHC Memory Card
That leads me to learning it is Class 4
Finally, This card from Amazon is Class 10 for $15
SanDisk Ultra 16 GB microSDHC Class 10 UHS-1 Memory Card 30MB/s with Adapter SDSDQUA-016G-U46A

So altogether so far I've spent $74 + $6 in shipping
39 for the R PI
12 for the case
8 for the breakout
15 for the SD card
Not as cheap as you'd think. I probably have a phone charger, HDMI cable, USB keyboard/mouse I can use. But if I had to buy all that I'd be over $100.
While I wait for it to come:
Some notes on ideas of what to do with it...
- Internet connected appliance that moves something depending on web info like stocks, weather, user commands.
- Remote activated widget from smartphone
- Connect to webcam and do some image processing function.
- Drive my laser light show, the Arduino wasn't making the rate I needed.
Operating system downloads are here:
http://www.raspberrypi.org/downloads
Looking for some examples of how to use the GPIO to communicate with the real world.
https://projects.drogon.net/raspberry-pi/gpio-examples/
https://projects.drogon.net/raspberry-pi/gpio-examples/tux-crossing/gpio-examples-1-a-single-led/
Downside seems to be that it is 3.3V logic, not 5V, so interface will be different. Less voltage for some analog interfaces.
Programming appears to be in Python or C. I haven't used Python, and I'm hesitant to learn yet another coding language. It appears I can use C and linux command line. I'm hoping this doesn't turn into being a software exercise that slows down the hardware fun!
Good article on using it as a media center
http://lifehacker.com/5929913/build-a-xbmc-media-center-with-a-35-raspberry-pi
Started by downloading the basic wheezy distro zip file 2013-02-09-wheezy-raspbian.zip
http://www.raspberrypi.org/downloads
"To use an image file, you will need to unzip it and write it to a suitable SD card using the UNIX tool dd. Windows users should use Win32DiskImager. "
http://sourceforge.net/projects/win32diskimager/ downloaded win32diskimager
unzipped the diskimager and the wheezy download zip file.
Ran the diskimager exe and pointed the diskimager at the unzipped .img file and the new 16Gb SD card and hit write. It took a few minutes and said done. Now the SD card can't be seen by the PC anymore. I suppose that is normal but I was hoping that the SD card could be a way to transfer files back and forth.
Got the raspberry PI in the mail. Plugged in the SD card I formatted above. Plugged in the USB cable to a phone charger, used an HDMI to DVI adapter cable to plug in a monitor. Plugged in a USB keyboard and mouse. Ethernet too. Voila! It booted right up to the desktop after one setup screen. I can surf the web.
Here is the screen with the desktop and linux terminal and the browser open, it was able to see the internet with no effort whatsoever.

I'd like a virtual keyboard so I don't need the USB keyboard.
http://www.raspberrypi.org/phpBB3/viewtopic.php?f=50&t=13735
sudo apt-get install matchbox
Then to to the accessories window and keyboard is now there. A virtual keyboard pops up. This is good for remote control apps
Tried to play a youtube video, it complains about missing flash
You need to type sudo first to get permission
Got lots of errors when it ran 404 errors not found, etc.. Fail
Did some looking to see if I can run Java on this platform, so I don't have to learn Python. Seems I can but memory space is very limited
http://www.oracle.com/technetwork/articles/java/raspberrypi-1704896.html
Here is a tutorial on the GPIO
http://log.liminastudio.com/writing/tutorials/tutorial-how-to-use-your-raspberry-pi-like-an-arduino

This example has a different numbering scheme...

I connected an LED and 2.2K resistor between the 3.3V power and GPIO 4 on the header and I wanted to light it up.
Flailed around alot with GPIO examples, not reading carefully, trying to download stuff and failing.
I learned that I needed to do a software update to my Raspberry PI OS because all the app-get commands were failing. This turned out to be key, even though I just imaged the disk straight from the RPi website yesterday.
sudo apt-get update
Looking for some examples of how to use the GPIO to communicate with the real world.
https://projects.drogon.net/raspberry-pi/gpio-examples/
https://projects.drogon.net/raspberry-pi/gpio-examples/tux-crossing/gpio-examples-1-a-single-led/
Downside seems to be that it is 3.3V logic, not 5V, so interface will be different. Less voltage for some analog interfaces.
Programming appears to be in Python or C. I haven't used Python, and I'm hesitant to learn yet another coding language. It appears I can use C and linux command line. I'm hoping this doesn't turn into being a software exercise that slows down the hardware fun!
Good article on using it as a media center
http://lifehacker.com/5929913/build-a-xbmc-media-center-with-a-35-raspberry-pi
Started by downloading the basic wheezy distro zip file 2013-02-09-wheezy-raspbian.zip
http://www.raspberrypi.org/downloads
"To use an image file, you will need to unzip it and write it to a suitable SD card using the UNIX tool dd. Windows users should use Win32DiskImager. "
http://sourceforge.net/projects/win32diskimager/ downloaded win32diskimager
unzipped the diskimager and the wheezy download zip file.
Ran the diskimager exe and pointed the diskimager at the unzipped .img file and the new 16Gb SD card and hit write. It took a few minutes and said done. Now the SD card can't be seen by the PC anymore. I suppose that is normal but I was hoping that the SD card could be a way to transfer files back and forth.
Got the raspberry PI in the mail. Plugged in the SD card I formatted above. Plugged in the USB cable to a phone charger, used an HDMI to DVI adapter cable to plug in a monitor. Plugged in a USB keyboard and mouse. Ethernet too. Voila! It booted right up to the desktop after one setup screen. I can surf the web.
Here is the screen with the desktop and linux terminal and the browser open, it was able to see the internet with no effort whatsoever.

I'd like a virtual keyboard so I don't need the USB keyboard.
http://www.raspberrypi.org/phpBB3/viewtopic.php?f=50&t=13735
sudo apt-get install matchbox
Then to to the accessories window and keyboard is now there. A virtual keyboard pops up. This is good for remote control apps
Tried to play a youtube video, it complains about missing flash
You need to type sudo first to get permission
Got lots of errors when it ran 404 errors not found, etc.. Fail
1
| sudo apt-get install iceweasel browser-plugin-gnashstill got lots of 404 errors |
Did some looking to see if I can run Java on this platform, so I don't have to learn Python. Seems I can but memory space is very limited
http://www.oracle.com/technetwork/articles/java/raspberrypi-1704896.html
Here is a tutorial on the GPIO
http://log.liminastudio.com/writing/tutorials/tutorial-how-to-use-your-raspberry-pi-like-an-arduino
This example has a different numbering scheme...
I connected an LED and 2.2K resistor between the 3.3V power and GPIO 4 on the header and I wanted to light it up.
Flailed around alot with GPIO examples, not reading carefully, trying to download stuff and failing.
I learned that I needed to do a software update to my Raspberry PI OS because all the app-get commands were failing. This turned out to be key, even though I just imaged the disk straight from the RPi website yesterday.
sudo apt-get update
sudo apt-get upgrade
Now the instructions in app-get have started working.
The definitive GPIO work appears to be this page:
https://projects.drogon.net/raspberry-pi/wiringpi/
This is how you install it and build it...
First install git.
sudo apt-get install git-core
Then install the libraries and build
git clone git://git.drogon.net/wiringPi
cd wiringPi ./build
Now the commands gpio -v, and gpio readall are recognized!
Looks like he numbers the pins differently than the previous examples, but at least combines a table showing all the numbering schemes. The pin I'm using is pin GPIO7.

https://projects.drogon.net/raspberry-pi/wiringpi/the-gpio-utility/
I'm using his basic command line utility on this page to control the GPIO pins.c
I flailed a bit until I did things in exactly the correct sequence. And the LED lights up! W00t! This was a bit frustrating up to this point, mostly because the steps weren't really spelled out and I didn't do things carefully and the gpio commands don't complain when you type the arguments all wrong.
This is exactly what did the trick (after WiringPI was installed using the commands above)
gpio export 7 out <-allows it to work without being the super user
gpio mode 7 out <-- sets the pin direction
gpio write 7 0 <--note that my led is set to light up when the output is LOW
After some messing around with bash syntax, I got this bash script working that blinked the LED. Far more frustrating than it should have been. Kept getting weird echo command not found errors on commands that weren't in the file, probably due to unpritable characters I pasted out of web posts. Finally typing it by hand solved the problem.c
Here is the first code that worked to blink the LED. Hooray! Paste this into a file, chmod 777, and then type ./<filename>
#!/bin/bash
gpio export 7 out
gpio mode 7 out
gpio write 7 0
while :
do
sleep 0.3
gpio write 7 1
sleep 0.3
gpio write 7 0
done

Next I want to try the C complilation method of controlling the rpi GPIO for some more complex apps
I attempted to run the blink program in WiringPI in c code next. This is how I did it:
cc -o cblink cblink.c -L/usr/local/lib -lwiringPi
sudo ./cblink
And hooray the LED starts blinking, just like my bash script earlier!!! Win!
THis guy has done some of the homework to remote control the PI
This page has info on remote login to the pi
http://simonthepiman.com/how_to_setup_remote_access.php
I don't really want to go with a fixed IP address as he describes. I'd much rather set up a system where the remote control and the raspberry pi find each other on the network.
It looks like putting .rc files in /boot will run them at starup. Im not sure about this yet but I need to know how to execute code on boot for when the rpi is running as an embedded machine. Need to come back to figure this out
A couple posts on remote login from this page
http://www.raspberrypi.org/phpBB3/viewtopic.php?f=2&t=742&p=17694
What you are looking for is FreeNX [ lacking development will not work out of the box ] NoMachine [ Commercial nothing ready for R-Pi ] and x2go. X2GO is Free / Open Source and being actively developed. It is now used with Skolelinux doing just what you are seeking. Seeing the specs of R-Pi model 'A' it is suitable. With Debian working on R-Pi x2go will also work but not yet tested.
You need not learn any thing to use that x2go on R-Pi a simple log-in will do, unless you wish to contribute then do learn about Linux.

I get a login window that asks for user and password. I try "pi" and "raspberry" and I'm in!

I execute my bash script blinkblink remotely and the light starts flashing. I have a achieved remote control access! I'll need a better program on the windows side to find the raspberry pi by MAC address, but a small victory.
Bought a WiFi module to plug into the PI USB from Adafruit. Page says it works right out of the box.
I plugged it in. I had to use the virtual keyboard because there are only two USB. I could have dug up a hub but I was lazy. I hotplugged it and that triggered a reboot.
I disconnected the ethernet cable and clicked on WiFi Config on the desktop. I didn't record the exact sequence of events, but I scanned for my network, found it. Then I double clicked on it (which wasn't the obvious thing to do) and a box came up and I was able to type the password. I'm using WPA PSK and that was fine. It connected and displayed the IP address directly.
Using puTTY from my PC, I could again log into that IP address as user pi, password raspberry and I'm in. Cool. WiFi was a snap.
I want the rpi to communicate over the internet to either other machines or to an android app.
http://iqjar.com/jar/sending-emails-from-the-raspberry-pi/
This post has it pulling down messages from web sites. Although there is no explanation of how it works.
http://lukeberndt.com/2013/c-node-js-module-for-spi-bus-led-signs/
Here is a good idea. Use google docs as a drop box. The pi will create and read docs.
http://learn.adafruit.com/dht-humidity-sensing-on-raspberry-pi-with-gdocs-logging/connecting-to-google-docs
another one
http://www.danielhansen.org/2013/03/raspberry-pi-temperature-logging-using.html
THese all use gspread to upload. no mention of download yet.
Setting up a webcam
http://stevenhickson.blogspot.com/2013/03/using-webcam-with-raspberry-pi.html
sudo apt-get install libcv-dev libopencv-dev libcv2.3 opencv-doc
sudo apt-get install python-opencv
http://stevenhickson-code.googlecode.com/svn/trunk/AUI/Imaging/test
chmod +x test
sudo apt-get install scrot
----------------------------------------------------------------------------------------------------------------
This post (like a lot of mine) is just my notes as I learn, and will build as I work on this. Or it may sit and rot while I'm distracted by another project or life in general :)
Now the instructions in app-get have started working.
The definitive GPIO work appears to be this page:
https://projects.drogon.net/raspberry-pi/wiringpi/
This is how you install it and build it...
First install git.
sudo apt-get install git-core
Then install the libraries and build
git clone git://git.drogon.net/wiringPi
cd wiringPi ./build
Now the commands gpio -v, and gpio readall are recognized!
Looks like he numbers the pins differently than the previous examples, but at least combines a table showing all the numbering schemes. The pin I'm using is pin GPIO7.

https://projects.drogon.net/raspberry-pi/wiringpi/the-gpio-utility/
I'm using his basic command line utility on this page to control the GPIO pins.c
I flailed a bit until I did things in exactly the correct sequence. And the LED lights up! W00t! This was a bit frustrating up to this point, mostly because the steps weren't really spelled out and I didn't do things carefully and the gpio commands don't complain when you type the arguments all wrong.
This is exactly what did the trick (after WiringPI was installed using the commands above)
gpio export 7 out <-allows it to work without being the super user
gpio mode 7 out <-- sets the pin direction
gpio write 7 0 <--note that my led is set to light up when the output is LOW
After some messing around with bash syntax, I got this bash script working that blinked the LED. Far more frustrating than it should have been. Kept getting weird echo command not found errors on commands that weren't in the file, probably due to unpritable characters I pasted out of web posts. Finally typing it by hand solved the problem.c
Here is the first code that worked to blink the LED. Hooray! Paste this into a file, chmod 777, and then type ./<filename>
#!/bin/bash
gpio export 7 out
gpio mode 7 out
gpio write 7 0
while :
do
sleep 0.3
gpio write 7 1
sleep 0.3
gpio write 7 0
done
Here is the Raspberry PI in the clear box, lots of wires sticking out of it. In the lower right you can see the red LED is soldered to a small connector and plugged into the GPIO pins so that it is connected between +3.3V and GPIO7 (or 4 depending on who is counting). The blink script is running and turning it on and off.

Next I want to try the C complilation method of controlling the rpi GPIO for some more complex apps
I attempted to run the blink program in WiringPI in c code next. This is how I did it:
- cd to wiringPI/examples and copied blink.c up to the user's home directory and renamed it cblink.c
- I modified LED to output on pin 7, like my bash script.
- Then I compiled it
cc -o cblink cblink.c -L/usr/local/lib -lwiringPi
- From the users home directory where the cblink.c program is sitting I ran it.
sudo ./cblink
And hooray the LED starts blinking, just like my bash script earlier!!! Win!
- I want to set up to rlogin into the Raspberry PI so it can be a remote internet appliance
- Need to set up rlogin
- Look into wifi communication, finding it on the net, sending messages, etc
- controlling remotely from a PC or smartphone is probably the ticket. Then I'd like to build an Android app that talks to it
THis guy has done some of the homework to remote control the PI
This page has info on remote login to the pi
http://simonthepiman.com/how_to_setup_remote_access.php
I don't really want to go with a fixed IP address as he describes. I'd much rather set up a system where the remote control and the raspberry pi find each other on the network.
It looks like putting .rc files in /boot will run them at starup. Im not sure about this yet but I need to know how to execute code on boot for when the rpi is running as an embedded machine. Need to come back to figure this out
A couple posts on remote login from this page
http://www.raspberrypi.org/phpBB3/viewtopic.php?f=2&t=742&p=17694
From my perspective (newbie, with a Windows main PC), there's 4 ways to do it, from simplest to install and barest functionality/comfort, to hardest to install but peachy once you've got it to run:
- get a text command line, via SSH and Putty on Windows
- do a kind-of Remote Desktop (Windows style) via a VNC server on the Pi, and a client on Windows. There's Ultra-, Tight-, True-, and plenty other VNCs for that, all with versions for windows, Linux (lots of flavours), and plenty other OSes, it is very standard. Be aware though that VNC does bitmaps, not vectors, so a lot more data needs to travel between the sever and client. Redraws are slowish and ugly.
- do a true Remote Desktop from Windows, using Windows RDP protocol, thanks to FreeNX server on the Linux machine. Vectorial, hence much faster and pleasant.
- take advantage of X11, which natively supports displaying one PC's stuff on another. Most Linuxes' user intefaces (lxde, gnome, KDE...) use X11. But Windows doesn't really have it, and getting it to run is a pain, the best solution I could find was actually install a Virtual Machine running Linux on my Windows PC, and do X11 remoting from there. Otherwise, there's a whole lot of hooplah involving Cygwin that's good for giving headaches, mainly.
Actually, a package and doc to enable good remoting to the Pi would be a very useful projects for those of us who do have a Windows PC.
- Posts: 1399
- Joined: Tue Aug 09, 2011 10:53 pm
What you are looking for is FreeNX [ lacking development will not work out of the box ] NoMachine [ Commercial nothing ready for R-Pi ] and x2go. X2GO is Free / Open Source and being actively developed. It is now used with Skolelinux doing just what you are seeking. Seeing the specs of R-Pi model 'A' it is suitable. With Debian working on R-Pi x2go will also work but not yet tested.
You need not learn any thing to use that x2go on R-Pi a simple log-in will do, unless you wish to contribute then do learn about Linux.
I need to find out what the IP address is so I can attempt remote access
basically it says ipconfig! I tried that first, I'm no noob, but it doesn't work! I get sudo: ipconfig: command not found. Whaaa?
Tried going to my router page and looking at the devices. My home network has 33 devices on it! Family of 5 with laptops, TVs, game systems, tablets, phones, printers. Find this one
| raspberrypi | 192.168.2.135 |
basically it says ipconfig! I tried that first, I'm no noob, but it doesn't work! I get sudo: ipconfig: command not found. Whaaa?
Read more carefully. if is "ifconfig" not "ipconfig"
ifconfig reports the IP address is 192.168.2.135
MAC address is b8:27:eb:04:f0:fc
This page describes how to scan for the rpi on the network using ipscanner and puTTY.
Downloaded and installed PuTTY. Clicked on putty.exe on this page:
Put the IP address above into putty and badaboom!

I get a login window that asks for user and password. I try "pi" and "raspberry" and I'm in!

I execute my bash script blinkblink remotely and the light starts flashing. I have a achieved remote control access! I'll need a better program on the windows side to find the raspberry pi by MAC address, but a small victory.
Bought a WiFi module to plug into the PI USB from Adafruit. Page says it works right out of the box.
I plugged it in. I had to use the virtual keyboard because there are only two USB. I could have dug up a hub but I was lazy. I hotplugged it and that triggered a reboot.
I disconnected the ethernet cable and clicked on WiFi Config on the desktop. I didn't record the exact sequence of events, but I scanned for my network, found it. Then I double clicked on it (which wasn't the obvious thing to do) and a box came up and I was able to type the password. I'm using WPA PSK and that was fine. It connected and displayed the IP address directly.
Using puTTY from my PC, I could again log into that IP address as user pi, password raspberry and I'm in. Cool. WiFi was a snap.
I want the rpi to communicate over the internet to either other machines or to an android app.
This post has it sending email. That is nice, not exactly what I want though.
This post has it pulling down messages from web sites. Although there is no explanation of how it works.
http://lukeberndt.com/2013/c-node-js-module-for-spi-bus-led-signs/
Here is a good idea. Use google docs as a drop box. The pi will create and read docs.
http://learn.adafruit.com/dht-humidity-sensing-on-raspberry-pi-with-gdocs-logging/connecting-to-google-docs
another one
http://www.danielhansen.org/2013/03/raspberry-pi-temperature-logging-using.html
THese all use gspread to upload. no mention of download yet.
Setting up a webcam
http://stevenhickson.blogspot.com/2013/03/using-webcam-with-raspberry-pi.html
sudo apt-get install libcv-dev libopencv-dev libcv2.3 opencv-doc
sudo apt-get install python-opencv
http://stevenhickson-code.googlecode.com/svn/trunk/AUI/Imaging/test
chmod +x test
sudo apt-get install scrot
----------------------------------------------------------------------------------------------------------------
This post (like a lot of mine) is just my notes as I learn, and will build as I work on this. Or it may sit and rot while I'm distracted by another project or life in general :)