Search This Blog

Saturday, December 21, 2013

Updated the Tuning Fork Android App


After about a year and a half I finally updated the tuning fork android app.

Cover art

This app started as a high quality signal generator for electronics.  I learned how to create precise high quality sine waves from the audio player.   In order to make something out of my efforts, I published it as a musical instrument tuning program.

Users had been complaining that the sliders I used to set pitch and note were finicky, and they were right.   Also my Java skills are 10X what they were when I wrote it, so I wanted to fix some things.

Since I have a new PC since I did the original Android work, I had to resurrect my Android/Eclipse setup, my keystore, and get adb usb connection working with my current Samsung phone (a whole post unto itself) as well get the drivers working with my old droids.

I converted the sliders to buttons to increment and decrement the tone and pitch.  I'm pretty happy with that.  If you want to change the pitch by a lot, it gets a little tedious pushing the button.  But for reasonable changes it is good and you can easily change it to whatever value you want.

Note Calculator & Tuning Fork - screenshot

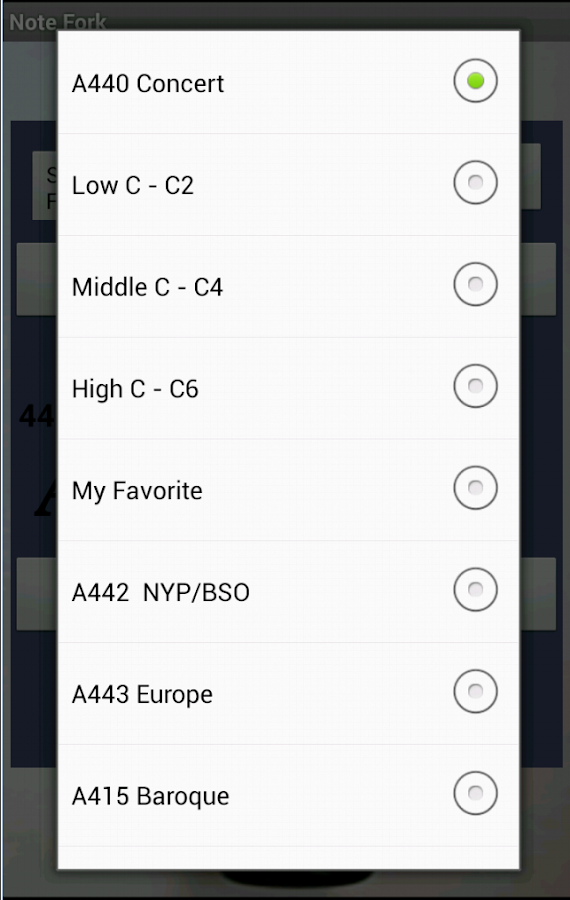
I added some common pitch and tone combos that musicians use as presets on a drop down menu.

Note Calculator & Tuning Fork - screenshot

Finally I added a save favorite button that allows you to remember a setting and recall it.   Android has the ability through SharedPreferences to save a small amount of data without requiring any user permissions.  I didn't want to make this simple app ask for any permissions from the user.

I also added a real help screen, not just a toast and fixed the menus to navigate back and forth logically.  onBackPressed() takes you back to the main screen, pressing it again stops the app.

I published the app at that point, version 1.3, just to make sure my keystore and google acount process still worked.   I didn't want to spend forever on this and find I couldn't update the app.

After that I tackled an annoying issue that was even more obvious when the app was changing notes via the buttons.   Each note change often resulted in a click, then a warble, and then the new tone would play perfectly.

I first thought the audio player wasn't starting and stopping smoothly, but I ruled that out.  Then I realized I was doing non thread safe updating of the tone array.   When the app is going to play a tone, it calculates the sine waveform and sets the length of the buffer to exactly the correct repeat so there is no glitch.  That was fundamental to the original design, to play a continuous frequency accurate tone without glitches.    The audio player runs in a child thread (activity) so that it doesn't block the UI.    However when the tone changed, the sound array had to be recalculated by the main thread.  Often the audio thread, while looping, would pick up the array half way through that process.  The result was a click and warble.

First I tried synchronizing the tone array variable, and various methods of synchronizing a function wrapped around updating this variable to prevent it being read by the player thread while it was being written.  This was a disaster.  Problem is, the way synchronization works, is it blocks a thread until the desired variable is not busy.   The end result was the user UI thread was being blocked by the looping audio thread, which never gave the UI a chance to update the array.   While this seems solvable it led to a lot of bad behavior by the app.

Finally I realized I should move the array updating functions into the audio thread.  The block of code that calculates the sine wave array is in the audio loop, but only conditionally runs when the desired note is changed.     Only the desired note and pitch is passed from the main to the audio thread.   This is much better because all the calculating and array filling which took time is not on the thread boundary.  Only a simple variable pass is needed.

The result is version 1.4, which smoothly changes notes when the buttons are pressed.  Hooray!  Enjoy.


Tuesday, December 10, 2013

Upgrade to teen gaming machine

This is the components I chose for XMAS present system upgrade for teens gaming machine. It won't rock the world like my other recent Haswell machine with the 4770K, but I think it will do pretty well.

I plan to replace the motherboard, cpu and graphics card and reuse the HDD, case and DDR3 memory from the 2009 AMD Phenom II build. I'll start out using the stock coolers.


$119.99 with $20 rebate (if I ever get it) from Amazon


Intel Core i5-4570 Haswell 3.2GHz LGA 1150 84W Quad-Core Desktop Processor Intel HD Graphics BX80646I54570
$189 from NewEgg after promo code. $30 cheaper than the i5-4670. 3.2G vs 3.4G. Nobody will notice the difference.


ASUS Z87-A LGA 1150 Intel Z87 HDMI SATA 6Gb/s USB 3.0 ATX Intel Motherboard
$119 from NewEgg after promo code. Best price for a Z87 mobo from a solid manufacturer


 Hardware went together fairly painlessly.   No major surprises.   Dropped in the CPU and closed the clamp.  I like the Intel CPU install way better than the old pin and socket mess. Applied heatsink compound.  Used the stock Intel cooler and it snapped right in.

The new 7790 video card didn't need the two extra power connectors like the old 4890 did.  (WRONG - note from future self)  I ended up with extra power supply connectors.  First time that ever happened.  

Transferred the memory, 4 sticks of 2GB Gskill DDR 1333.  Pretty low end for this machine but I'll save upgrading that for later.   DDR sockets were a bit weird, only had a lever on one end.  You have to tilt them in and snap it down.   Didn't like that.

Keep the WD SATA hard drive with windows installed.

The DVD drive was IDE and there is no IDE connector on the mobo.  So I have to dump the DVD drive.  That is a bit of an issue because I'm going to need to load drivers.  Hopefully I can download them or transfer them via USB stick from another machine.   I copied all the mobo drivers over to a USB stick in preparation.

On the first pass the fans come up but no beep.  No video.   I realized I left off the CPU power connector.  It has an 8 pin connector and my supply only has 4 pins.  I learned before you can plug a 4 pin into half the connector and that is totally legal.   Plugged in the CPU power connector.  Duh.

Pushed the power button and it booted, beeped and the mobo lights came up OK.   First issue was their was no graphics output.   I had both monitors plugged into DVI-D cables in the new video card.  After a lot of fumbling around with the monitors I still got no signal on any settings.  Swapped to a VGA cable because sometimes all DVI systems miss the boot messages.  Nothing.  No signal.

Finally I realized that the mobo/cpu has integrated graphics and it is probably still using that and doesn't recognized the video card.  I moved the VGA cable to the onboard VGA port and now I see the boot, BIOS, etc.  Whew.

Now the issue is, windows won't start.   It wants to do system repair or start normally.  Start normally doesn't work and bounces me back to system repair.    System repair runs, takes 1/2 hour or so to tell me that it can't do anything.  Roadblock, trying google.

http://www.tomshardware.com/forum/42670-63-windows-boot-motherboard-bios
conclusion says I have to re-install windows.  Ugg.  Must be a better way, and I don't have a DVD drive working on this machine.  I would have to pull a sata dvd from another machine to reinstall windows, and my son doesn't want all his files and settings wiped out.    Still looking.

http://www.tomshardware.com/forum/304001-30-bsod-motherboard
This post describes some options.  Maybe I can do it with f8 safe mode.   Don't see the safe mode option, but I can go to command line mode through the advanced options.

The post above says to do to use command line:
dism /image:c:\ /add-driver /Driver:d:\ /recurse

Plugged in the USB stick with the mobo DVD copied onto it. I had to change the C: to D: and the D: to E: to match where it thought my hdd and usb stick were and it started doing stuff. It installed a lot of drivers, a few complaints about things it couldn't install. Waiting...  Took 15 minutes or so.

Closed and hit reboot.... It worked!!   Took longer than normal but finally brought me to the windows login without complaining.

Windows 7 wants the product key again.  Doesn't work, will have to use phone activation.  I'll do that later.

Loaded the ATI catalyst from the USB stick copy of the install CD.  It installed but still not seeing the graphics card.  Device manager doesn't see it.   Something is wrong.

Opened the box.  Looked at the graphics card again.  It DOES have a power connector, it is not at the end of the card, which is all plastic and heat sink.  It is on the bottom at the top corner about two thirds of the way down the card.    Plugged in the 12V power and rebooted.   Now the main DVI monitor comes up on the first try.   You gotta be kidding me.   Missed two power connectors and wasted at least an hour getting this up and running.

Re-installed the AMD graphics from the USB stick and now everything comes up cleanly and both monitors are working in DVI-D mode.

Ran a windows performance information recheck.  Here are the numbers in windows 7.
Processor  was 6.5 --> 7.6   cool
Memory  7.7
Graphics  7.7
Gaming  7.7
Disk 5.9 (no change of course)
Total is 5.9 because of the disk.

Last issue was sound didn't work.   I'm using external speakers with the standard green plug, not the HDMI speakers since I have DVI-D cables attached.   I was getting a red x on the speaker and the troubleshooter said speakers were not plugged in, but they are.

Went back and ran the asus mobo driver tool from the USB stick and re-installed the Audiotek drivers.  That was successful.

Let the gaming begin!