Hobby blog about tech tips I've picked up, projects I'm working on, or links to useful information and cool stuff. I'm an Electrical Engineer and professional Analog IC designer for 25 years playing in my spare time. Arduino, hacking consumer electronics, video game hardware, satellite TV, PC building, Android apps, appliance repairs and whatever else that interests me.
Search This Blog
Saturday, December 21, 2013
Updated the Tuning Fork Android App
After about a year and a half I finally updated the tuning fork android app.
This app started as a high quality signal generator for electronics. I learned how to create precise high quality sine waves from the audio player. In order to make something out of my efforts, I published it as a musical instrument tuning program.
Users had been complaining that the sliders I used to set pitch and note were finicky, and they were right. Also my Java skills are 10X what they were when I wrote it, so I wanted to fix some things.
Since I have a new PC since I did the original Android work, I had to resurrect my Android/Eclipse setup, my keystore, and get adb usb connection working with my current Samsung phone (a whole post unto itself) as well get the drivers working with my old droids.
I converted the sliders to buttons to increment and decrement the tone and pitch. I'm pretty happy with that. If you want to change the pitch by a lot, it gets a little tedious pushing the button. But for reasonable changes it is good and you can easily change it to whatever value you want.
I added some common pitch and tone combos that musicians use as presets on a drop down menu.
Finally I added a save favorite button that allows you to remember a setting and recall it. Android has the ability through SharedPreferences to save a small amount of data without requiring any user permissions. I didn't want to make this simple app ask for any permissions from the user.
I also added a real help screen, not just a toast and fixed the menus to navigate back and forth logically. onBackPressed() takes you back to the main screen, pressing it again stops the app.
I published the app at that point, version 1.3, just to make sure my keystore and google acount process still worked. I didn't want to spend forever on this and find I couldn't update the app.
After that I tackled an annoying issue that was even more obvious when the app was changing notes via the buttons. Each note change often resulted in a click, then a warble, and then the new tone would play perfectly.
I first thought the audio player wasn't starting and stopping smoothly, but I ruled that out. Then I realized I was doing non thread safe updating of the tone array. When the app is going to play a tone, it calculates the sine waveform and sets the length of the buffer to exactly the correct repeat so there is no glitch. That was fundamental to the original design, to play a continuous frequency accurate tone without glitches. The audio player runs in a child thread (activity) so that it doesn't block the UI. However when the tone changed, the sound array had to be recalculated by the main thread. Often the audio thread, while looping, would pick up the array half way through that process. The result was a click and warble.
First I tried synchronizing the tone array variable, and various methods of synchronizing a function wrapped around updating this variable to prevent it being read by the player thread while it was being written. This was a disaster. Problem is, the way synchronization works, is it blocks a thread until the desired variable is not busy. The end result was the user UI thread was being blocked by the looping audio thread, which never gave the UI a chance to update the array. While this seems solvable it led to a lot of bad behavior by the app.
Finally I realized I should move the array updating functions into the audio thread. The block of code that calculates the sine wave array is in the audio loop, but only conditionally runs when the desired note is changed. Only the desired note and pitch is passed from the main to the audio thread. This is much better because all the calculating and array filling which took time is not on the thread boundary. Only a simple variable pass is needed.
The result is version 1.4, which smoothly changes notes when the buttons are pressed. Hooray! Enjoy.
Tuesday, December 10, 2013
Upgrade to teen gaming machine
This is the components I chose for XMAS present system upgrade for teens gaming machine. It won't rock the world like my other recent Haswell machine with the 4770K, but I think it will do pretty well.
I plan to replace the motherboard, cpu and graphics card and reuse the HDD, case and DDR3 memory from the 2009 AMD Phenom II build. I'll start out using the stock coolers.
$119.99 with $20 rebate (if I ever get it) from Amazon
Intel Core i5-4570 Haswell 3.2GHz LGA 1150 84W Quad-Core Desktop Processor Intel HD Graphics BX80646I54570
$189 from NewEgg after promo code. $30 cheaper than the i5-4670. 3.2G vs 3.4G. Nobody will notice the difference.
ASUS Z87-A LGA 1150 Intel Z87 HDMI SATA 6Gb/s USB 3.0 ATX Intel Motherboard
$119 from NewEgg after promo code. Best price for a Z87 mobo from a solid manufacturer
Hardware went together fairly painlessly. No major surprises. Dropped in the CPU and closed the clamp. I like the Intel CPU install way better than the old pin and socket mess. Applied heatsink compound. Used the stock Intel cooler and it snapped right in.
The new 7790 video card didn't need the two extra power connectors like the old 4890 did. (WRONG - note from future self) I ended up with extra power supply connectors. First time that ever happened.
Transferred the memory, 4 sticks of 2GB Gskill DDR 1333. Pretty low end for this machine but I'll save upgrading that for later. DDR sockets were a bit weird, only had a lever on one end. You have to tilt them in and snap it down. Didn't like that.
Keep the WD SATA hard drive with windows installed.
The DVD drive was IDE and there is no IDE connector on the mobo. So I have to dump the DVD drive. That is a bit of an issue because I'm going to need to load drivers. Hopefully I can download them or transfer them via USB stick from another machine. I copied all the mobo drivers over to a USB stick in preparation.
On the first pass the fans come up but no beep. No video. I realized I left off the CPU power connector. It has an 8 pin connector and my supply only has 4 pins. I learned before you can plug a 4 pin into half the connector and that is totally legal. Plugged in the CPU power connector. Duh.
Pushed the power button and it booted, beeped and the mobo lights came up OK. First issue was their was no graphics output. I had both monitors plugged into DVI-D cables in the new video card. After a lot of fumbling around with the monitors I still got no signal on any settings. Swapped to a VGA cable because sometimes all DVI systems miss the boot messages. Nothing. No signal.
Finally I realized that the mobo/cpu has integrated graphics and it is probably still using that and doesn't recognized the video card. I moved the VGA cable to the onboard VGA port and now I see the boot, BIOS, etc. Whew.
Now the issue is, windows won't start. It wants to do system repair or start normally. Start normally doesn't work and bounces me back to system repair. System repair runs, takes 1/2 hour or so to tell me that it can't do anything. Roadblock, trying google.
http://www.tomshardware.com/forum/42670-63-windows-boot-motherboard-bios
conclusion says I have to re-install windows. Ugg. Must be a better way, and I don't have a DVD drive working on this machine. I would have to pull a sata dvd from another machine to reinstall windows, and my son doesn't want all his files and settings wiped out. Still looking.
http://www.tomshardware.com/forum/304001-30-bsod-motherboard
This post describes some options. Maybe I can do it with f8 safe mode. Don't see the safe mode option, but I can go to command line mode through the advanced options.
The post above says to do to use command line:
dism /image:c:\ /add-driver /Driver:d:\ /recurse
Plugged in the USB stick with the mobo DVD copied onto it. I had to change the C: to D: and the D: to E: to match where it thought my hdd and usb stick were and it started doing stuff. It installed a lot of drivers, a few complaints about things it couldn't install. Waiting... Took 15 minutes or so.
Closed and hit reboot.... It worked!! Took longer than normal but finally brought me to the windows login without complaining.
Windows 7 wants the product key again. Doesn't work, will have to use phone activation. I'll do that later.
Loaded the ATI catalyst from the USB stick copy of the install CD. It installed but still not seeing the graphics card. Device manager doesn't see it. Something is wrong.
Opened the box. Looked at the graphics card again. It DOES have a power connector, it is not at the end of the card, which is all plastic and heat sink. It is on the bottom at the top corner about two thirds of the way down the card. Plugged in the 12V power and rebooted. Now the main DVI monitor comes up on the first try. You gotta be kidding me. Missed two power connectors and wasted at least an hour getting this up and running.
Re-installed the AMD graphics from the USB stick and now everything comes up cleanly and both monitors are working in DVI-D mode.
Ran a windows performance information recheck. Here are the numbers in windows 7.
Processor was 6.5 --> 7.6 cool
Memory 7.7
Graphics 7.7
Gaming 7.7
Disk 5.9 (no change of course)
Total is 5.9 because of the disk.
Last issue was sound didn't work. I'm using external speakers with the standard green plug, not the HDMI speakers since I have DVI-D cables attached. I was getting a red x on the speaker and the troubleshooter said speakers were not plugged in, but they are.
Went back and ran the asus mobo driver tool from the USB stick and re-installed the Audiotek drivers. That was successful.
Let the gaming begin!
I plan to replace the motherboard, cpu and graphics card and reuse the HDD, case and DDR3 memory from the 2009 AMD Phenom II build. I'll start out using the stock coolers.
Intel Core i5-4570 Haswell 3.2GHz LGA 1150 84W Quad-Core Desktop Processor Intel HD Graphics BX80646I54570
$189 from NewEgg after promo code. $30 cheaper than the i5-4670. 3.2G vs 3.4G. Nobody will notice the difference.
ASUS Z87-A LGA 1150 Intel Z87 HDMI SATA 6Gb/s USB 3.0 ATX Intel Motherboard
$119 from NewEgg after promo code. Best price for a Z87 mobo from a solid manufacturer
Hardware went together fairly painlessly. No major surprises. Dropped in the CPU and closed the clamp. I like the Intel CPU install way better than the old pin and socket mess. Applied heatsink compound. Used the stock Intel cooler and it snapped right in.
The new 7790 video card didn't need the two extra power connectors like the old 4890 did. (WRONG - note from future self) I ended up with extra power supply connectors. First time that ever happened.
Transferred the memory, 4 sticks of 2GB Gskill DDR 1333. Pretty low end for this machine but I'll save upgrading that for later. DDR sockets were a bit weird, only had a lever on one end. You have to tilt them in and snap it down. Didn't like that.
Keep the WD SATA hard drive with windows installed.
The DVD drive was IDE and there is no IDE connector on the mobo. So I have to dump the DVD drive. That is a bit of an issue because I'm going to need to load drivers. Hopefully I can download them or transfer them via USB stick from another machine. I copied all the mobo drivers over to a USB stick in preparation.
On the first pass the fans come up but no beep. No video. I realized I left off the CPU power connector. It has an 8 pin connector and my supply only has 4 pins. I learned before you can plug a 4 pin into half the connector and that is totally legal. Plugged in the CPU power connector. Duh.
Pushed the power button and it booted, beeped and the mobo lights came up OK. First issue was their was no graphics output. I had both monitors plugged into DVI-D cables in the new video card. After a lot of fumbling around with the monitors I still got no signal on any settings. Swapped to a VGA cable because sometimes all DVI systems miss the boot messages. Nothing. No signal.
Finally I realized that the mobo/cpu has integrated graphics and it is probably still using that and doesn't recognized the video card. I moved the VGA cable to the onboard VGA port and now I see the boot, BIOS, etc. Whew.
Now the issue is, windows won't start. It wants to do system repair or start normally. Start normally doesn't work and bounces me back to system repair. System repair runs, takes 1/2 hour or so to tell me that it can't do anything. Roadblock, trying google.
http://www.tomshardware.com/forum/42670-63-windows-boot-motherboard-bios
conclusion says I have to re-install windows. Ugg. Must be a better way, and I don't have a DVD drive working on this machine. I would have to pull a sata dvd from another machine to reinstall windows, and my son doesn't want all his files and settings wiped out. Still looking.
http://www.tomshardware.com/forum/304001-30-bsod-motherboard
This post describes some options. Maybe I can do it with f8 safe mode. Don't see the safe mode option, but I can go to command line mode through the advanced options.
The post above says to do to use command line:
dism /image:c:\ /add-driver /Driver:d:\ /recurse
Plugged in the USB stick with the mobo DVD copied onto it. I had to change the C: to D: and the D: to E: to match where it thought my hdd and usb stick were and it started doing stuff. It installed a lot of drivers, a few complaints about things it couldn't install. Waiting... Took 15 minutes or so.
Closed and hit reboot.... It worked!! Took longer than normal but finally brought me to the windows login without complaining.
Windows 7 wants the product key again. Doesn't work, will have to use phone activation. I'll do that later.
Loaded the ATI catalyst from the USB stick copy of the install CD. It installed but still not seeing the graphics card. Device manager doesn't see it. Something is wrong.
Opened the box. Looked at the graphics card again. It DOES have a power connector, it is not at the end of the card, which is all plastic and heat sink. It is on the bottom at the top corner about two thirds of the way down the card. Plugged in the 12V power and rebooted. Now the main DVI monitor comes up on the first try. You gotta be kidding me. Missed two power connectors and wasted at least an hour getting this up and running.
Re-installed the AMD graphics from the USB stick and now everything comes up cleanly and both monitors are working in DVI-D mode.
Ran a windows performance information recheck. Here are the numbers in windows 7.
Processor was 6.5 --> 7.6 cool
Memory 7.7
Graphics 7.7
Gaming 7.7
Disk 5.9 (no change of course)
Total is 5.9 because of the disk.
Last issue was sound didn't work. I'm using external speakers with the standard green plug, not the HDMI speakers since I have DVI-D cables attached. I was getting a red x on the speaker and the troubleshooter said speakers were not plugged in, but they are.
Went back and ran the asus mobo driver tool from the USB stick and re-installed the Audiotek drivers. That was successful.
Let the gaming begin!
Saturday, November 30, 2013
Samsung Galaxy S4 - USB debugging mode in Android 4.2 and higher
Back to writing android applications.
With my new Samsung Galaxy 4, there is no longer a button for USB Debug Mode!
This setting allowed aps you develop in eclipse with the android sdk to be run directly on your phone when plugged into the USB cable. Otherwise you have to post the apk file to the web, and turn on the "allow aps from unknown sources" every time you want to test your app on a real device. Now it's gone.
This is a long trail of notes on what I did. For the impatient, skip to the bottom, I summed it up at the end
A little googling found this: Google hid the feature to protect the random user.
Read more at http://dottech.org/87439/how-to-unlock-usb-debugging-mode-on-android-4-2-jelly-bean-and-higher-guide/#fAVhAE2oVbDEJwQe.99
Hmmm...
The phone says "You are now a developer". So it clearly worked. But still not seeing the phone in Eclipse adb run chooser....
Phone says "Connected as an installer"
http://stackoverflow.com/questions/16256048/eclipse-android-sdk-cannot-see-new-samsung-galaxy-s4-device-via-a-usb-connection
same answers. I have the drivers installed and i did the 7x. Still nothing.
from \Local\Android\android-sdk\platform-tools
Tried
adb kill-server
adb start server
Didn't work. Still can't see the device.
Tried these drivers...
http://www.samsung.com/us/support/owners/product/SCH-I545ZWAVZW
Nothing.
http://stackoverflow.com/questions/3908301/why-doesnt-eclipse-see-my-samsung-galaxy-phone-even-though-i-can-transfer-files
Tried installing KIES.
http://www.samsung.com/us/kies/#downloadWindows
Still not showing up in adb. Arrggh
I doesn't even show up under Unknown Devices
Although it does show up as a portable device and i can see the sd card, etc.
Tried installing the drivers in KIES manually. No dice.
This website shows where to get drivers
http://developer.android.com/tools/extras/oem-usb.html
Tried the Moto drivers to get my old Droid 2 working again just to prove it is not eclipse.
Back to visit previous self...
http://blog.workingsi.com/2011/12/getting-started-developing-apps-on.html
Tried these drivers. The unkown device goes away and I see a USB drive.
https://motorola-global-portal.custhelp.com/app/answers/detail/a_id/88481/action/auth
I go to the moto phone and it is now saying USB is in storage mode. Change it to "PC mode" on the phone menu.
Drivers spin and it re-installs on the PC. Motorola ADB Interface is listed in the things windows says is ready to use. USB drive is gone and under network adapters in the device manager is "Motorola USB Networking Driver".
"adb devices" returns a number for the moto phone now. But in eclipse I still don't see it.
I tried the samsung changing usb mode to "media device" and "camera" neither helped adb see it.
It is hung up in USB stick mode. I don't see a listing under "Network adapters"
I scoured the settings on the samsung again. I find under Settings->More->Developer options, there is now a button that says USB Debugging Mode. It is unclicked.
Whaaa Daaa Faaaa??? How could I have missed that. The secret unlock just reveals the button, I sitll have to click it.
Things start happening on the device manager, installing, etc.
Now I see SAMSUNG_Android in the Other devices for a sec until it blips out.
It doesn't like the installed samsung driver and after a few seconds, blips and goes back to being a usb stick.
http://forum.xda-developers.com/showthread.php?t=1601739
says uninstall kies and just do the samsung drivers
Pull up a commandline, go to Documents and Settings\username\.android directory, and do
this is the code for samsung
Folllowed those instructions, but the usb driver folder C:\Program Files (x86)\Samsung\USB Drivers\25_escape didn't exist in my install.
Went back to the kies site and downloaded the older version of kies and installed
Not in there either. Fail
http://www.samsung.com/us/function/search/espsearchResult.do?input_keyword=adb&keywords=adb
There is a link in the posts to the lastest adb driver. it's broken
http://www.samsung.com/us/support/downloads/SPH-P100ZKASPR
selected the carrier and model number
Doesn't work.
Putting the USB in "Camera" mode left the SAMSUNG_Android in the device manager. MTP mode
makes it dissapear. Windows tries to install a driver for it in this mode and fails.
A day of complete frustration.
http://www.mediafire.com/download/5kcxc1yovvl6740/SAMSUNG_USB_Driver_for_Mobile_Phones%282%29.exe
back to google
http://www.droidforums.net/forum/samsung-galaxy-s4/249648-issues-adb.html
Read a bunch of pages about rooting. I'm doing everything they say. Fail.
regroup.
Finally tried device manager one more time, right clicked on the unknown device and picked choose from compatible drivers. Let me pick from a list. Strangely I got a list of moto and generic adb drivers. I picked adb composite device. it installed with a warning.
Now adb devices gives me a response! Device manager other device dissapeared . So it might not be healthy yet. ADB Interface device showed up on top of the device manager.
I run ecllipse and I suddenly have a device! it looks a little broken but finally something is happening.
I find I can't select it. OK is greyed out .
Try switching to one of the moto composite drivers. Requires rebooting. Fail. Now it has dissapeared again.
Went back to the single composite ADB sooner driver on the list.
Tried to figure out why it was unauthorized
http://stackoverflow.com/questions/19485467/adb-wireless-device-unauthorized
The phone had never asked me to authorize. I went to the developer settings menu on the phone.
Uncliked usb debug. Pressed the button that says revoke permissions. Unplugged the phone.
Plugged it back in, re-enabled usb debug and tadah! It asked me to give the computer permission.
I did so and and adb devices now says the device is there!
It works!!! OMG. This was the biggest pain in the arse. Eclipse now reports the phone there.
I don't know if anyone could follow my notes, and i'm too fed up to clean them up.
The gist is this.
With my new Samsung Galaxy 4, there is no longer a button for USB Debug Mode!
This setting allowed aps you develop in eclipse with the android sdk to be run directly on your phone when plugged into the USB cable. Otherwise you have to post the apk file to the web, and turn on the "allow aps from unknown sources" every time you want to test your app on a real device. Now it's gone.
This is a long trail of notes on what I did. For the impatient, skip to the bottom, I summed it up at the end
A little googling found this: Google hid the feature to protect the random user.
How to find and turn on USB debugging mode in Android 4.2 and higher
To see the option for USB debugging mode in Android 4.2 or higher, do the following:
- Open up your device’s “Settings”. This can be done by pressing the Menu button while on your home screen and tapping “System settings”
- Now scroll to the bottom and tap “About phone”
- At the “About” screen, scroll to the bottom and tap on “Build number” seven times.
- Make sure you tap seven times. If you see a “You are now a developer!” message pop up, then you know you have done it correctly.
Done! By tapping on “Build number” seven times, you have unlocked USB debugging mode on Android 4.2 and higher. You can now enable/disable it whenever you desire by going to “Settings” -> “Developer Options” -> “Debugging” ->” USB debugging”.
Read more at http://dottech.org/87439/how-to-unlock-usb-debugging-mode-on-android-4-2-jelly-bean-and-higher-guide/#fAVhAE2oVbDEJwQe.99
Hmmm...
The phone says "You are now a developer". So it clearly worked. But still not seeing the phone in Eclipse adb run chooser....
Phone says "Connected as an installer"
http://stackoverflow.com/questions/16256048/eclipse-android-sdk-cannot-see-new-samsung-galaxy-s4-device-via-a-usb-connection
same answers. I have the drivers installed and i did the 7x. Still nothing.
from \Local\Android\android-sdk\platform-tools
Tried
adb kill-server
adb start server
Didn't work. Still can't see the device.
Tried these drivers...
http://www.samsung.com/us/support/owners/product/SCH-I545ZWAVZW
Nothing.
http://stackoverflow.com/questions/3908301/why-doesnt-eclipse-see-my-samsung-galaxy-phone-even-though-i-can-transfer-files
Tried installing KIES.
Kies 3 | Supported models : Note 3 and devices with Android 4.3. |
Still not showing up in adb. Arrggh
I doesn't even show up under Unknown Devices
Although it does show up as a portable device and i can see the sd card, etc.
Tried installing the drivers in KIES manually. No dice.
This website shows where to get drivers
http://developer.android.com/tools/extras/oem-usb.html
Tried the Moto drivers to get my old Droid 2 working again just to prove it is not eclipse.
Back to visit previous self...
http://blog.workingsi.com/2011/12/getting-started-developing-apps-on.html
2) Install the development USB driver on your Windows computerMore surfing...http://developer.android.com/guide/developing/device.html I think need to install the windows adb driver for my phone on my computer. You need a special USB driver for developers.http://developer.motorola.com/docstools/USB_Drivers/ Clicked on Handset USB Driver for Windows 64 bit, had to register and all that junkDownloaded, installed Motorola Mobile Drivers Installation 5.2.0Rebooted
3) Verify that you can see the phone from the computerReading the http://developer.android.com/guide/developing/device.html site again, I got some more info on how to run "adb devices".
Turns out you run this in a command window on the windows box, after you cd over to the directory where the android sdk is installed. Ran it there. Duh. Here you see the command running for me.
You can verify that your device is connected by executingadb devices
from your SDKplatform-tools/
directory. If connected, you'll see the device name listed as a "device."
Or, to upgrade an existing Android USB driver on Windows 7 with the new driver:
- Connect your Android-powered device to your computer's USB port.
- Right-click on Computer from your desktop or Windows Explorer, and select Manage.
- Select Device Manager in the left pane of the Computer Management window.
- Locate and expand Android Phone in the right pane.
- Right-click Android Composite ADB Interface and select Update Driver. This will launch the Hardware Update Wizard.
- Select Install from a list or specific location and click Next.
- Select Search for the best driver in these locations; un-check Search removable media; and check Include this location in the search.
- Click Browse and locate the USB driver folder. (The Google USB Driver is located in
<sdk>\extras\google\usb_driver\
.) - Click Next to upgrade the driver.
Tried these drivers. The unkown device goes away and I see a USB drive.
https://motorola-global-portal.custhelp.com/app/answers/detail/a_id/88481/action/auth
Drivers spin and it re-installs on the PC. Motorola ADB Interface is listed in the things windows says is ready to use. USB drive is gone and under network adapters in the device manager is "Motorola USB Networking Driver".
"adb devices" returns a number for the moto phone now. But in eclipse I still don't see it.
I tried the samsung changing usb mode to "media device" and "camera" neither helped adb see it.
It is hung up in USB stick mode. I don't see a listing under "Network adapters"
I scoured the settings on the samsung again. I find under Settings->More->Developer options, there is now a button that says USB Debugging Mode. It is unclicked.
Whaaa Daaa Faaaa??? How could I have missed that. The secret unlock just reveals the button, I sitll have to click it.
Things start happening on the device manager, installing, etc.
Now I see SAMSUNG_Android in the Other devices for a sec until it blips out.
It doesn't like the installed samsung driver and after a few seconds, blips and goes back to being a usb stick.
http://forum.xda-developers.com/showthread.php?t=1601739
says uninstall kies and just do the samsung drivers
Have it working - and did remember I have Kies installed.Maybe I downloaded both the separate driver and Kies?http://forum.xda-developers.com/showthread.php?t=1624166
USB Driver Link:http://org.downloadcenter.samsung.co...1_3_2360_0.exe
Kies Link:http://org.downloadcenter.samsung.co...1082_152_4.exe
Know I have problem still with Kies... but I can use ODIN without issues.I can't really explain how I did it, as there was a lot of trial and error and I wasn't keeping notes. But the basic trick was to right click in device manager on the unknown SAMSUNG_Android device, choose Update Driver, choose "Let me pick", choose "Have disk", point to the "SAMSUNG\USB Drivers\25_escape" folder from the KIES installation, and then choose "Samsung Mobile USB Composite Device".
You may then get another unknown device, which using the same method you set to ADB. I did a bunch of stuff in different ways, trying to match different drivers from the 25_escape folder to different devices, until it finally worked.
Pull up a commandline, go to Documents and Settings\username\.android directory, and do
Code:
echo 0x04e8 >> adb_usb.ini
this is the code for samsung
Folllowed those instructions, but the usb driver folder C:\Program Files (x86)\Samsung\USB Drivers\25_escape didn't exist in my install.
Went back to the kies site and downloaded the older version of kies and installed
Not in there either. Fail
http://www.samsung.com/us/function/search/espsearchResult.do?input_keyword=adb&keywords=adb
There is a link in the posts to the lastest adb driver. it's broken
http://www.samsung.com/us/support/downloads/SPH-P100ZKASPR
selected the carrier and model number
Win XP/Vista/Win 7/Win 8 | Nov 9, 2012 | ENGLISH | 23.06 |
Putting the USB in "Camera" mode left the SAMSUNG_Android in the device manager. MTP mode
makes it dissapear. Windows tries to install a driver for it in this mode and fails.
A day of complete frustration.
http://www.mediafire.com/download/5kcxc1yovvl6740/SAMSUNG_USB_Driver_for_Mobile_Phones%282%29.exe
back to google
http://www.droidforums.net/forum/samsung-galaxy-s4/249648-issues-adb.html
Read a bunch of pages about rooting. I'm doing everything they say. Fail.
regroup.
Finally tried device manager one more time, right clicked on the unknown device and picked choose from compatible drivers. Let me pick from a list. Strangely I got a list of moto and generic adb drivers. I picked adb composite device. it installed with a warning.
Now adb devices gives me a response! Device manager other device dissapeared . So it might not be healthy yet. ADB Interface device showed up on top of the device manager.
I run ecllipse and I suddenly have a device! it looks a little broken but finally something is happening.
I find I can't select it. OK is greyed out .
Try switching to one of the moto composite drivers. Requires rebooting. Fail. Now it has dissapeared again.
Went back to the single composite ADB sooner driver on the list.
Tried to figure out why it was unauthorized
http://stackoverflow.com/questions/19485467/adb-wireless-device-unauthorized
The phone had never asked me to authorize. I went to the developer settings menu on the phone.
Uncliked usb debug. Pressed the button that says revoke permissions. Unplugged the phone.
Plugged it back in, re-enabled usb debug and tadah! It asked me to give the computer permission.
I did so and and adb devices now says the device is there!
It works!!! OMG. This was the biggest pain in the arse. Eclipse now reports the phone there.
I don't know if anyone could follow my notes, and i'm too fed up to clean them up.
The gist is this.
- 7 pushes on build to enable the developer menu in the phone info screen
- Go to the now visible developer menu and select USB debugging
- Install the samsung usb drivers. Don't know which version really did it, if any. From Kies or from their website
- Plug in the phone
- Tell the USB to go to "camera" mode
- Go to windows device manager and right click on the unknown samsung device
- Select browse and select from list
- Pick adb single sooner driver
- Go back to the phone developer menu and unauthorize devices. plug it in again and it should ask to allow the computer to connect. Say yes.
- Win!
Saturday, November 2, 2013
Sony VAIO SVT13112FXS ultrabook blue screen caused by iastor.sys
My beloved Sony VAIO ultrabook laptop, model SVT13112FXS (SVT131A11L) is crashing every 10 minutes or so, even if it is idle, with a blue screen (BSOD). Blue screen says the problem is related to iastor.sys . This machine runs Windows 7.
This machine has a hard drive and a solid state cache drive and iastor.sys is the intel RAID driver that allows the computer to use two drives as if it is a single drive, do fast caching, etc.
This all started after I left the machine behind at home on an international trip. Normally it is my travelling companion, but this time I didn't want the hassle of taking two laptops through security. I left it at home, unplugged, and probably in sleep mode. The battery drained completely and when I returned it was lifeless. I plugged it in and it complained that windows wasn't shut down properly but otherwise initially everything seemed OK. After 10 minutes of use, the blue screens started.
In the end the fix was to replace the SSD cache drive. This is a hardware problem, not a software problem. Not a difficult repair. Involved unscrewing the back cover and pulling out one module and buying a replacement off eBay for $35. A little fooling around with the BIOS and Intel Rapid Store Software and all is good.
Here is the whole debug trail...
Possible causes
Here is what I tried
This machine has a hard drive and a solid state cache drive and iastor.sys is the intel RAID driver that allows the computer to use two drives as if it is a single drive, do fast caching, etc.
This all started after I left the machine behind at home on an international trip. Normally it is my travelling companion, but this time I didn't want the hassle of taking two laptops through security. I left it at home, unplugged, and probably in sleep mode. The battery drained completely and when I returned it was lifeless. I plugged it in and it complained that windows wasn't shut down properly but otherwise initially everything seemed OK. After 10 minutes of use, the blue screens started.
In the end the fix was to replace the SSD cache drive. This is a hardware problem, not a software problem. Not a difficult repair. Involved unscrewing the back cover and pulling out one module and buying a replacement off eBay for $35. A little fooling around with the BIOS and Intel Rapid Store Software and all is good.
Here is the whole debug trail...
Possible causes
- iastor.sys (Located in C:\windows\system32\drivers\iastor.sys) is corrupt
- A hardware problem with one of the disks
- Malware (this is a favorite vulnerability among hackers)
- Virus scanner killing the machine on purpose when it finds something it can't fix
Here is what I tried
- System restore to older time. Didn't solve the problem, and I regressed to before I started having the issue.
- Ran chkdsk (right click on the drive, tools, check disk) and schedule a scan, reboot. chkdsk fails in the middle with the BSOD and it reboots endlessly scanning and crashing.
- I removed the hard drive and put it in another machine and ran chkdsk. Completed and found no errors. But it back in the laptop and still crashes
- Ran sfc /SCANNOW which completes, and says no errors. Still crashes.
- Downloaded and ran tdsskill.exe from Kaspersky. This is supposed to catch malware that poses as iastor.sys. It ran and found no problems.
- Ignore all the lies about rkill, malwarebytes, etc. Those programs have never worked for me and you end up getting more malware on your machine.
- Full virus scan of the disk from another machine. It's clean
- Msconfig, went through and stopped every process from the start menu that I didn't recognize. Didn't help
- Tried to replace the iastor.sys files by hand. My other computers don't have this file to copy from since they don't have a RAID.
- Renamed the iastor.sys to iastor.sys.X. Now the machine won't load windows. It wants to do startup repair but eventually BSOD's into the same screen. Dead end.
- Put the drive back in another machine and restored the iastore.sys and iastorV.sys files from a previous version
- Went to https://downloadcenter.intel.com/Detail_Desc.aspx?DwnldID=17882 to download iastor.sys from Intel. None of the packages recent packages contained a 64 bit iastor.sys, just various versions like iastorV.sys, iastorF.sys. WTF?
- Downloaded IATA89CD.exe from above site and ran. This is supposed to contain the Intel Matrix Storage Manager. It is dated 2009 it seems, don't know how this could be the right file. A window pops up and says the computer has version 11.0.0.1032 and the installer wants to overwrite with 8.9.0.1023. Seems wrong. Plowing ahead. It installs OK and reboots.
- Won't start windows anymore. Bombs Lovely. Startup repair wants to run and restore the machine to an earlier point. Fail. Didn't let it regress but startup repair failed.
- Rebooted and tried startup repair again. Fail. However the machine did not load windows, and I got another BSOD for iastor.sys. Now i'm stuck in a loop of BSOD and startup repair.
- Eventually it lets me do a system restore and back out the changes to an earlier time. Finally it boots to windows but I'm back where I started with repeated BSODs.
- May have downloaded the wrong thing. Searched again and found this: https://downloadcenter.intel.com/Detail_Desc.aspx?agr=Y&ProdId=2101&DwnldID=23060&keyword=intel+rapid+Storage+Technology+(Intel+RST)&lang=eng
- Installed it successfully. Restarted the computer. windows boots. Now I have multiple versions of iastor. iastorF.sys, iastorV.sys, iastorA.sys, as well as iastor.sys. Letting the computer sit for a while to see what happens. Boom BSOD. Fail.
- This must be a hardware problem since I've done everything conceivable to fix iastor.sys
- I want to try disabling the cache drive in the BIOS. Drive may be malfunctioning. F2 at the black sony screen is the way to get to BIOS: https://us.en.kb.sony.com/app/answers/detail/a_id/35240. Can't find any way to access the disk drives in the BIOS! WTF? BIOS has been nerfed.
- I need to pull the cache drive. Went hunting for it. Unscrewed the three large screws on the battery and removed the battery. THree screws to remove the hard drive cover. Unscrewed the hard drive too, four more screws. (did this previously because I had put it in another machine). Opened up the back panel by removing all the small black screws around the outside edges on the bottom and two silver ones in the battery compartment. The bottom cover pops off with a little prying.
VAIO with the battery and hard drive removed |
VAIO with the back cover removed. The PCIe SSD cache drive is the small green circuit board on the top edge towards the left. |
- Found the SSD cache drive. The little module at the top edge near the WLAN module. Removed one screw and pulled it out. It is about 2.5 inches by 1.5 inches with two samsung chips on it.
Removed Samsung SSD |
- reBooted and I get a disk drive BIOS menu now! It noticed something changed.
- First attempt I tried to just bypass the bios screen, I get "operating system not found" Power off and restart.
- Next I try <Ctrl I> when it asked me and it tells me the cache volume is not present. Do I want to disable it? Bingo. Answer yes.
- Computer boots to windows. A lot slower now. too bad. But it works!
- If this fixes the problem I will have to decide if I'm going to buy a replacement cache drive, live with the slower boot, or buy a single SSD drive and figure out how to reload windows from scratch.
- So far so good. System is stable. It is no longer BSOD every few minutes. Problem is I don't really know if the problem is the cache drive hardware or the software that talks to it. Since I removed the drive, both are gone now. Seems like I fully explored the software corruption angle, but it is impossible to be sure it wasn't a related file that expressed itself as an iastor.sys BSOD.
- Found a used replacement 32GB drive on ebay, they are pulls from used equipment. Prices vary from $29 to $49 for a new one. Many are shipped from the far east.
- Found some refurbs from US sellers
- http://www.ebay.com/itm/151116902504
- Pulled the trigger for $35. I figured it is worth the risk. If the problem returns, then it isn't the hard drive and I can resell the part on eBay.
- I will update the post when the new part comes. Meanwhile I'm back in business without the cache drive. Computer works normally, it is just slower to boot and hibernate. 24 hours plus and still going without a BSOD.
- New part came in the mail. Looks identical to the old one.
- Opened the laptop back up again
- Plugged in the replacement drive.
- Rebooted. Now it noticed something was different and the disk BIOS menu came up,
- and I pressed Ctrl I to configure as i did before.
- I tried options 1 and 5 and both said Error. "Not enough available space to create a volume". I eventually I just exited and it booted normally. I'm not sure if the caching is going to automatically turn back on.
- Hard to tell if cache is working
- Rebooted again and the BIOS menu came up again. Dang. It still says "Disabled" next to the cache drive. Can't find out how to enable it. When I disabled it before it was obvious, but I didn't take a picture.
- Disk shows up in windows under computer management but no options to enable it are obvious
- Re-installed the windows RAID driver software I downloaded above https://downloadcenter.intel.com/Detail_Desc.aspx?agr=Y&ProdId=2101&DwnldID=23060&keyword=intel+rapid+Storage+Technology+(Intel+RST)&lang=eng
- From Windows: Start->All Programs -> "Intel Rapid Storage Technology"
- Status "Your system is functioning normally" and I see the a 30GB RAID array with 11 and 19GB sections.
- A message at the bottom says "Acceleration using solid state drives: Disabled" and please reconnect the the accelerated disk or volume..
- Indicates that the drive is no longer accessible.
- In the manage menus
- Turned off and disabled the SSD cache, reset the drive
- Tried to re-enable accleration, it says I must reboot
- rebooted
- Reentered Intel Rapid Storage Technology-> Performance, and turned on Acceleration!
- Now it works. W00t!
- It appears I had to clear out all the old data on the refurb drive and re-associate it. I think it was looking for the old drive ID. Looks like I'm back in business.
- Soaking to see if it crashes. So far so good. 24 hours + and no BSOD.
- Victory declared!
Saturday, August 17, 2013
Java app to draw SVG files in prep for sending to CNC machine
I'm in the midst of writing the control program for an Ardunio powered CNC machine.
I've decided I'll use SVG format to drive the CNC machine from the PC.
I can generate SVG files from other pictures with this online free tool:
http://www.autotracer.org/
This tool allows you to view and edit them, and draw my own directly.
http://svg-edit.googlecode.com/svn/branches/2.6/editor/svg-editor.html
Here is the spec on the SVG file format
http://www.w3.org/TR/2011/REC-SVG11-20110816/paths.html#PathDataMovetoCommands
This is the SVG for a little graphic with some letters and a square I made.
<?xml version="1.0" standalone="yes"?>
<svg width="161" height="150">
<path style="fill:#ffffff; stroke:none;" d="M0 0L0 150L161 150L161 0L0 0z"/>
<path style="fill:#010101; stroke:none;" d="M1 1L1 109L117 109L117 1L1 1z"/>
<path style="fill:#ffffff; stroke:none;" d="M3 3L3 107L115 107L115 85C87.676 91.5053 87.5147 47.4563 115 54L115 3L3 3z"/>
<path style="fill:#010101; stroke:none;" d="M41 43L41 85L49 85L49 69C54.56 69 61.8856 70.2342 66.9568 67.5432C74.8268 63.3671 75.3453 49.6136 67.956 44.7423C61.5192 40.4989 48.4628 43 41 43M80 43L80 50L88 50L88 43L80 43z"/>
<path style="fill:#ffffff; stroke:none;" d="M49 50L49 62C66.8383 61.9882 66.8383 50.0118 49 50z"/>
<path style="fill:#010101; stroke:none;" d="M80 54L80 85L88 85L88 54L80 54z"/>
<path style="fill:#ffffff; stroke:none;" d="M107.043 59.9707C98.9687 61.792 101.299 81.8813 109.794 79.1489C117.684 76.611 116.364 57.8683 107.043 59.9707z"/>
</svg>
This builds on stuff in these previous posts.
The major pieces are
-Open and read in svg files
-Parse them line by line to pull out the graphics commands
-Draw the vectors/curves on the screen
-Write out the CNC machine commands to the serial interface. That program is already written but needs to be integrated.
Having some compatibility problems with the various svg editors.
I like the files autotracer.org makes, but svg-edit.googlecode.com can't read them. GIMP will import and display them just fine. internet explorer doesn't like them either, and displays a blank page. The files from svg-edit.googlecode.com have a lot of complex commands in them.
Figured out that I want to just use the path tool in svg-edit.googlecode.com. The format is a bit different though.
svg-edit gives me this:
<path id="svg_11" d="m367,98l121,8l3,71l33,-118" stroke-linecap="null" stroke-linejoin="null" stroke-dasharray="null" stroke="#ff0000" fill="#ffffff"/>
<path style="fill:#c1bfb3; stroke:none;" d="M119 16L120 17L119 16z"/>
Played around a bit, and svg-edit seems to make files that gimp renders better.
Pushing forward, I'll try to interpret both styles.
Wrote the file handling and parsing code in Java, now I need to write the graphics so I can draw a picture on the screen to see what the cnc thinks it's going to draw. That is the best way to see if I've translated the file properly too.
This took days and days to get right. Starting with some simple pictures of curves drawn in svg-edit through some vectorized complex pictures I eventually got this to work! I had some trouble with the relative curve commands and decoding the curve commands and the compound commands. The code gets over complicated and handling the absolute and relative syntax from the different svg file generators took a while to sort out.
The program opens an svg file, and then parses the commands into path lists of points. Curves are expanded into lists of points for the CNC machine to draw. Java graphics draw the lists of points so I can see if it looks right.
Things I learned:
The code at this point is posted at
https://code.google.com/p/arduino-java-xyzcnc/downloads/list
Here is the steps to make a vector image file
I'm finding that svg-edit doesn't like the autotracer.org files if opened directly. Also svg-edit works better in internet explorer than chrome (where is pretty broken). If you hit the <svg> button and hand paste the .svg file from autotracer.org into svg-edit, it seems to work. Not sure what the syntax issue is, something in the headers.
Here i show editing the svg file:
notes for my to do list.
Things I learned:
- c commands have all the points relative to the starting point, not the last point in the list.
- m is absolute if first in line, relative if later in line
- if m shows up mid line, need to lift the pen and start a new line. at that point. Also true of M
The code at this point is posted at
https://code.google.com/p/arduino-java-xyzcnc/downloads/list
Here is the steps to make a vector image file
First I just used power point to make some text. This could come from anywhere. |
Then I cut and pasted the words into gimp and saved it as a .png graphics file. Again the png/gif/etc could come from any source |
Then I went to autotracer.org and uploaded the file. Hit send file and then download the resulting .svg file from the top. |
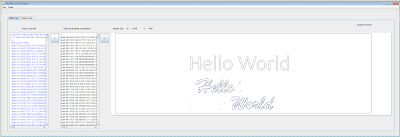
Then I used my Java program to open the .svg file, filter and plot it to the screen. W00t! It worked!!! Now I have a vector file that I can send to the CNC machine. |
I'm finding that svg-edit doesn't like the autotracer.org files if opened directly. Also svg-edit works better in internet explorer than chrome (where is pretty broken). If you hit the <svg> button and hand paste the .svg file from autotracer.org into svg-edit, it seems to work. Not sure what the syntax issue is, something in the headers.
Here i show editing the svg file:
Open the file in internet explorer, svg-edit. Did this by pasting the previous svg into the text window. Edited it and moved some words. |
Wrote out a new svg file. This time the commands are all in relative syntax. |
It works! Here it is in the Java program. |
notes for my to do list.
- Need to fix Java graphics repaint - DONE (added overide of paint to redo the drawing)
- Get rid of all the system.out.println's for debug - DONE
- need to make background non-white because some lines are disappearing. - DONE
- Also need to smarten up the calculation for how many segments I linearize the curves - DONE
Now to combine it with the CNC control java program...
This post is in progress....
Friday, August 2, 2013
Java app to draw SVG Bezier curves
I'm in the midst of writing the control program for an Ardunio powered CNC machine.
I've decided I'll use SVG format to drive the CNC machine from the PC.
I can generate SVG files from other pictures with this online free tool:
http://www.autotracer.org/
This tool allows you to view and edit them, and draw my own directly.
http://svg-edit.googlecode.com/svn/branches/2.6/editor/svg-editor.html
Here is the spec on the SVG file format
http://www.w3.org/TR/2011/REC-SVG11-20110816/paths.html#PathDataMovetoCommands
This is a little graphic with some letters and a square I made.
<?xml version="1.0" standalone="yes"?>
<svg width="161" height="150">
<path style="fill:#ffffff; stroke:none;" d="M0 0L0 150L161 150L161 0L0 0z"/>
<path style="fill:#010101; stroke:none;" d="M1 1L1 109L117 109L117 1L1 1z"/>
<path style="fill:#ffffff; stroke:none;" d="M3 3L3 107L115 107L115 85C87.676 91.5053 87.5147 47.4563 115 54L115 3L3 3z"/>
<path style="fill:#010101; stroke:none;" d="M41 43L41 85L49 85L49 69C54.56 69 61.8856 70.2342 66.9568 67.5432C74.8268 63.3671 75.3453 49.6136 67.956 44.7423C61.5192 40.4989 48.4628 43 41 43M80 43L80 50L88 50L88 43L80 43z"/>
<path style="fill:#ffffff; stroke:none;" d="M49 50L49 62C66.8383 61.9882 66.8383 50.0118 49 50z"/>
<path style="fill:#010101; stroke:none;" d="M80 54L80 85L88 85L88 54L80 54z"/>
<path style="fill:#ffffff; stroke:none;" d="M107.043 59.9707C98.9687 61.792 101.299 81.8813 109.794 79.1489C117.684 76.611 116.364 57.8683 107.043 59.9707z"/>
</svg>
I need to be able to interpret the Bezier curve commands and calculate the points to drive the Arduino to.
Some References:
The last one has the code at the end that I ended up starting with.
First I want to make the Java program to compute all the points, and draw them.
Here is the initial implementation of the code at the end of this post
It worked and drew a curve! Now I need to draw curves with two control points that are entered, and control the number of points in the curve. Looks like those functions are here.
A little fooling around and I figured out the functions and made a GUI to draw the curves and the control points
Posted the source code and jar file here:
https://code.google.com/p/arduino-java-xyzcnc/downloads/list
https://code.google.com/p/arduino-java-xyzcnc/downloads/detail?name=BezierDraw.jar
This is the guts of the routine:
package bezierdraw;
import java.awt.geom.Point2D;
public class BezierCurve {
Point2D.Double[] cp;
int numberOfPoints;
Point2D.Double[] curvePoints;
public BezierCurve(Point2D.Double[] cp, int numPoints) {
this.cp = cp;
numberOfPoints = numPoints;
curvePoints = new Point2D.Double[numPoints];
computeBezier();
}
protected Point2D.Double[] getCurvePoints() {
return curvePoints;
}
private void computeBezier() {
double dt = 1.0 / (numberOfPoints - 1);
for(int j = 0; j < numberOfPoints; j++)
curvePoints[j] = getCurvePoint(j*dt);
}
private Point2D.Double getCurvePoint(double t)
{
Point2D.Double result = new Point2D.Double();
/* calculate the polynomial coefficients */
double cx = 3.0 * (cp[1].x - cp[0].x);
double bx = 3.0 * (cp[2].x - cp[1].x) - cx;
double ax = cp[3].x - cp[0].x - cx - bx;
double cy = 3.0 * (cp[1].y - cp[0].y);
double by = 3.0 * (cp[2].y - cp[1].y) - cy;
double ay = cp[3].y - cp[0].y - cy - by;
/* calculate the curve point at parameter value t */
double tSquared = t * t;
double tCubed = tSquared * t;
result.x = (ax * tCubed) + (bx * tSquared) + (cx * t) + cp[0].x;
result.y = (ay * tCubed) + (by * tSquared) + (cy * t) + cp[0].y;
return result;
}
}
private void drawBezierPath(Point2D.Double p1, Point2D.Double cp1, Point2D.Double cp2, Point2D.Double p2, int numPoints) {
Point2D.Double[] points = { p1, cp1, cp2, p2 };
BezierCurve curve = new BezierCurve(points, numPoints);
Point2D.Double[] p = curve.getCurvePoints();
path = new GeneralPath();
for(int j = 0; j < p.length; j++) {
if(j == 0)
path.moveTo((float)p[j].x, (float)p[j].y);
else
path.lineTo((float)p[j].x, (float)p[j].y);
}
g2d.setColor(Color.red);
g2d.draw(path);
}
That is the basic C function. Now for the S function. The shorthand curve notation is a bit confusing.
http://stackoverflow.com/questions/5287559/calculating-control-points-for-a-shorthand-smooth-svg-path-bezier-curve
From the SVG spec
I am only doing a cubic curve, and there are quadratic and elliptical types. Need to see if I need to implement the others or if I can get by with just implementing the Bezier cubic.
I've decided I'll use SVG format to drive the CNC machine from the PC.
I can generate SVG files from other pictures with this online free tool:
http://www.autotracer.org/
This tool allows you to view and edit them, and draw my own directly.
http://svg-edit.googlecode.com/svn/branches/2.6/editor/svg-editor.html
Here is the spec on the SVG file format
http://www.w3.org/TR/2011/REC-SVG11-20110816/paths.html#PathDataMovetoCommands
This is a little graphic with some letters and a square I made.
<?xml version="1.0" standalone="yes"?>
<svg width="161" height="150">
<path style="fill:#ffffff; stroke:none;" d="M0 0L0 150L161 150L161 0L0 0z"/>
<path style="fill:#010101; stroke:none;" d="M1 1L1 109L117 109L117 1L1 1z"/>
<path style="fill:#ffffff; stroke:none;" d="M3 3L3 107L115 107L115 85C87.676 91.5053 87.5147 47.4563 115 54L115 3L3 3z"/>
<path style="fill:#010101; stroke:none;" d="M41 43L41 85L49 85L49 69C54.56 69 61.8856 70.2342 66.9568 67.5432C74.8268 63.3671 75.3453 49.6136 67.956 44.7423C61.5192 40.4989 48.4628 43 41 43M80 43L80 50L88 50L88 43L80 43z"/>
<path style="fill:#ffffff; stroke:none;" d="M49 50L49 62C66.8383 61.9882 66.8383 50.0118 49 50z"/>
<path style="fill:#010101; stroke:none;" d="M80 54L80 85L88 85L88 54L80 54z"/>
<path style="fill:#ffffff; stroke:none;" d="M107.043 59.9707C98.9687 61.792 101.299 81.8813 109.794 79.1489C117.684 76.611 116.364 57.8683 107.043 59.9707z"/>
</svg>
I need to be able to interpret the Bezier curve commands and calculate the points to drive the Arduino to.
Some References:
- http://stackoverflow.com/questions/9245666/calculate-the-perimeter-of-a-bezier-curve-in-java
- http://stackoverflow.com/questions/5634460/quadratic-bezier-curve-calculate-point
- http://www.itk.ilstu.edu/faculty/javila/SVG/SVG_drawing1/cubic_curve.htm
- https://forums.oracle.com/thread/1221004
The last one has the code at the end that I ended up starting with.
First I want to make the Java program to compute all the points, and draw them.
Here is the initial implementation of the code at the end of this post
It worked and drew a curve! Now I need to draw curves with two control points that are entered, and control the number of points in the curve. Looks like those functions are here.
A little fooling around and I figured out the functions and made a GUI to draw the curves and the control points
Posted the source code and jar file here:
https://code.google.com/p/arduino-java-xyzcnc/downloads/list
https://code.google.com/p/arduino-java-xyzcnc/downloads/detail?name=BezierDraw.jar
This is the guts of the routine:
package bezierdraw;
import java.awt.geom.Point2D;
public class BezierCurve {
Point2D.Double[] cp;
int numberOfPoints;
Point2D.Double[] curvePoints;
public BezierCurve(Point2D.Double[] cp, int numPoints) {
this.cp = cp;
numberOfPoints = numPoints;
curvePoints = new Point2D.Double[numPoints];
computeBezier();
}
protected Point2D.Double[] getCurvePoints() {
return curvePoints;
}
private void computeBezier() {
double dt = 1.0 / (numberOfPoints - 1);
for(int j = 0; j < numberOfPoints; j++)
curvePoints[j] = getCurvePoint(j*dt);
}
private Point2D.Double getCurvePoint(double t)
{
Point2D.Double result = new Point2D.Double();
/* calculate the polynomial coefficients */
double cx = 3.0 * (cp[1].x - cp[0].x);
double bx = 3.0 * (cp[2].x - cp[1].x) - cx;
double ax = cp[3].x - cp[0].x - cx - bx;
double cy = 3.0 * (cp[1].y - cp[0].y);
double by = 3.0 * (cp[2].y - cp[1].y) - cy;
double ay = cp[3].y - cp[0].y - cy - by;
/* calculate the curve point at parameter value t */
double tSquared = t * t;
double tCubed = tSquared * t;
result.x = (ax * tCubed) + (bx * tSquared) + (cx * t) + cp[0].x;
result.y = (ay * tCubed) + (by * tSquared) + (cy * t) + cp[0].y;
return result;
}
}
private void drawBezierPath(Point2D.Double p1, Point2D.Double cp1, Point2D.Double cp2, Point2D.Double p2, int numPoints) {
Point2D.Double[] points = { p1, cp1, cp2, p2 };
BezierCurve curve = new BezierCurve(points, numPoints);
Point2D.Double[] p = curve.getCurvePoints();
path = new GeneralPath();
for(int j = 0; j < p.length; j++) {
if(j == 0)
path.moveTo((float)p[j].x, (float)p[j].y);
else
path.lineTo((float)p[j].x, (float)p[j].y);
}
g2d.setColor(Color.red);
g2d.draw(path);
}
That is the basic C function. Now for the S function. The shorthand curve notation is a bit confusing.
http://stackoverflow.com/questions/5287559/calculating-control-points-for-a-shorthand-smooth-svg-path-bezier-curve
From the SVG spec
Command | Name | Parameters | Description |
---|---|---|---|
C(absolute) c (relative) | curveto | (x1 y1 x2 y2 x y)+ | Draws a cubic Bézier curve from the current point to (x,y) using (x1,y1) as the control point at the beginning of the curve and (x2,y2) as the control point at the end of the curve. C (uppercase) indicates that absolute coordinates will follow; c (lowercase) indicates that relative coordinates will follow. Multiple sets of coordinates may be specified to draw a polybézier. At the end of the command, the new current point becomes the final (x,y) coordinate pair used in the polybézier. |
S(absolute) s (relative) | shorthand/smooth curveto | (x2 y2 x y)+ | Draws a cubic Bézier curve from the current point to (x,y). The first control point is assumed to be the reflection of the second control point on the previous command relative to the current point. (If there is no previous command or if the previous command was not an C, c, S or s, assume the first control point is coincident with the current point.) (x2,y2) is the second control point (i.e., the control point at the end of the curve). S (uppercase) indicates that absolute coordinates will follow; s (lowercase) indicates that relative coordinates will follow. Multiple sets of coordinates may be specified to draw a polybézier. At the end of the command, the new current point becomes the final (x,y) coordinate pair used in the polybézier. |
I am only doing a cubic curve, and there are quadratic and elliptical types. Need to see if I need to implement the others or if I can get by with just implementing the Bezier cubic.
Tuesday, July 30, 2013
Upgrading Arduino XYZ CNC Machine Tool Motor
For a tool motor I previously used a scrounged rechargeable DC drill motor and chuck. The motor was from a 12V rechargeable drill. I used an Arduino and PWM to modulate the speed, but had to make a custom MOSFET hbridge add on to deal with the high current. This post: http://blog.workingsi.com/2011/05/notes-on-heavy-duty-motor-sheild-for.html poorly documents my previous work ;-).
The circuit I had worked fine for controlling the motor, but after some discussion with friends I decided that my motor was really not spinning at high enough RPM for most engraving and cutting jobs.
Two options I see
- Use my dremel and add a solid state relay to control the AC. I probably won't be able to modulate speed any more
- Buy a purpose build CNC DC spindle motor.
I also struggled a bit with a good motor mount for the old drill motor. I had a hose clamp around it but it looked lame and didn't seem very well aligned and stable.
I decided to invest in a high RPM spindle motor. Zen toolworks has two grades they sell. Fairly expensive, and the cheaper one is known to have high runout. I don't really like the plastic brackets, although the whole machine is made out of it, so I suppose it's strong enough.
Another vendor had a motor with a fan, and an aluminum mount. Total price would be about the the same.
However I noticed that the vendor ships from China. Long wait. I've bought stuff this way and it is usually OK, but I avoid it if I can. Impossible to return things if you are unhappy.
I poked around ebay. Found the same motors everywhere for a variety of prices. Almost all ship from China or Hong Kong.
Finally decided to buy this one for $79 from a US vendor. A little pricey. I hope it's worth it. It had a fan and the mounting block I need. Nice. I'll pay the premium for US seller.
http://www.ebay.com/itm/300878974659?ssPageName=STRK:MEWNX:IT&_trksid=p3984.m1497.l2649
I previously used a MCH3484 and a MCH3383 MOSFETs to make an Hbridge to PWM the speed from the Arduino. That should work again.
I also need a power supply. The specs say this:
- Work voltage: 12-48vdc (Suggest to use DC 48V)
- Rotation speed: 3000-12000r/min
- Power: 300w
- Torque:230mn.m
300W at 48V means 6.25A at highest power
This little $12 DC/DC converter gives me 120W/5A, but I have to supply it with another DC input. That means I need a power supply to drive my power supply. No thanks.
A bigger one for 10A and 500W. $28
This little $12 DC/DC converter gives me 120W/5A, but I have to supply it with another DC input. That means I need a power supply to drive my power supply. No thanks.
A bigger one for 10A and 500W. $28
I poked around looking for an AC powered 36V or 48V DC lab supply with little success on ebay or amazon. Digikey has stuff for >$200. Wow. Maybe this wasn't such a good idea.
I'll keep looking for now for a deal on eBay, before I build a power supply.
The motor came. It is a beast. Much bigger than the old drill motor. The aluminum mount is nice.
I'll need to drill mounting holes in the plate on the Zen.
I used my drill press to stick through the four mounting holes and drill through the face plate of the gantry. (I took the faceplate off). I found four lockwashers in my junk bin that fit the bolts that came with the mounting bracket and tightened it all up.
It went together surprisingly well, no issues whatsoever!
Here it is mounted back on the Zen toolworks machine. I'm a little worried I went over the top on this one, since the faceplate is attached with 6 tiny screws and the mounting bracket has four giant bolts and 1/4 aluminum. I'll go easy with this thing and not rev it up full speed.
Slight assembly issue, the gantry screws are now behind the motor. I need to loosen the bolts, remove the motor from the mount, re-attach the gantry and put the motor back in. A little extra work.
Clearance looks good inside the gantry. The bolts don't hit anything.
36V 10A 350W AC to DC Switch Power Supply Transformer for LED Strip light CCTV
http://cgi.ebay.com/ws/eBayISAPI.dll?ViewItem&item=231020237543
Input Voltage: 100~120V AC, 200~240V AC (Preset 220V)
Output Voltage: 36V DC
Output Current: 10A
Shell Material: Metal case / Aluminum base
Protection: Shortage Protection, Overload Protection, Over Voltage Protection
It is only 36V versus the 48V that the motor can go to, but I think that 36V will be enough and 48V will be crazy fast. I have some hope of my hbridge motor driver still working up to 36V.
Motor finally came, a little faster than I expected but I was out of town.
The power supply is a bit confusing, There is no power plug and mysteriously labeled terminal screw strip. A little googling on the part number LIHUA-360W on the side is encouraging. Looks like lots of people use these for reprap 3D printer power supplies (the 12V version).
http://www.youtube.com/watch?v=HsbyccSemy8
You connect the power cord to the GND, N(neutral) & L(line) connections. =V and -V are 36V output. Hopefully the rails aren't divided such that I can't get the 3A I need from one terminal, or maybe I can gang them.
I cut the end of an extra standard heavy duty three prong monitor power cord, and stripped the wires. There is a green (GND), white (neutral) and black (line) wire. |
Hooked them up like this to the power supply like this. Green to gnd, White to N and black to L. |
You can see the green light on the left comes on. |
I connected a cord to the DC output voltage. |
Hooked it temporarily to the motor supply and plugged it in. Whirrrrrrrrr! |
While the motor was running, I measured the power supply voltage. If I was overloading the supply then I'd expect the voltage would have drooped. Good news, it still read 36.0V with the motor running.
I used the adjustment potentiometer to turn up the voltage to max, which measured around 39.1V. There was a noticeable pitch change in the speed of the motor, so the extra couple of volts made a difference. The motor is rated to 48V but I'm going to settle for 39V.
Subscribe to:
Posts (Atom)